Deploying Application using Kubernetes with YAML code


Introduction
In this tutorial, we will guide you through the process of deploying applications using Kubernetes.
We will cover the use of Kubernetes Manifest files to define and deploy multiple Kubernetes objects, including Deployments, Services, and StatefulSets. Through the use of examples and explanations, you will learn how to use these tools to deploy and manage a web application in a Kubernetes cluster. By the end of this tutorial, you should have a solid understanding of how to use Kubernetes to deploy and manage your applications.
Scenario: “How can I deploy a web application with a front-end, middle-end, and stateful database using Kubernetes Services and Deployments, and expose the front-end and middle-end to external traffic via LoadBalancers?”
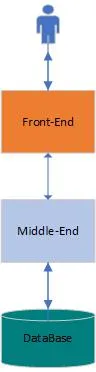
To answer this question, you can use the Manifest file provided in the previous response, which creates the following resources in the “web-app” namespace:
A LoadBalancer Service called “front-end” that exposes the front-end Deployment to external traffic on port 80.
A Deployment called “front-end” with 2 replicas of a container running the front-end application.
A LoadBalancer Service called “middle-end” exposes the middle-end Deployment to external traffic on port 80.
A Deployment called “middle-end” with 3 replicas of a container running the middle-end application.
A ClusterIP Service called “database” that exposes the database StatefulSet to other resources in the cluster on port 27017.
A StatefulSet called “database” with 4 replicas of a container running the MongoDB database, with persistent storage to preserve the data across restarts.
Let's see practically how we can write the code using the YAML syntax
apiVersion: v1
kind: Service
metadata:
  name: front-end
  namespace: web-app
  labels:
    app: front-end
spec:
  selector:
    app: front-end
  ports:
  - protocol: TCP
    port: 80
    targetPort: 80
  type: LoadBalancer
---
apiVersion: apps/v1
kind: Deployment
metadata:
  name: front-end
  namespace: web-app
  labels:
    app: front-end
spec:
  replicas: 2
  selector:
    matchLabels:
      app: front-end
  template:
    metadata:
      labels:
        app: front-end
    spec:
      containers:
      - name: front-end
        image: front-end:latest
        ports:
        - containerPort: 80
---
apiVersion: v1
kind: Service
metadata:
  name: middle-end
  namespace: web-app
  labels:
    app: middle-end
spec:
  selector:
    app: middle-end
  ports:
  - protocol: TCP
    port: 80
    targetPort: 80
  type: LoadBalancer
---
apiVersion: apps/v1
kind: Deployment
metadata:
  name: middle-end
  namespace: web-app
  labels:
    app: middle-end
spec:
  replicas: 3
  selector:
    matchLabels:
      app: middle-end
  template:
    metadata:
      labels:
        app: middle-end
    spec:
      containers:
      - name: middle-end
        image: middle-end:latest
        ports:
        - containerPort: 80
---
apiVersion: v1
kind: Service
metadata:
  name: database
  namespace: web-app
  labels:
    app: database
spec:
  selector:
    app: database
  ports:
  - protocol: TCP
    port: 27017
    targetPort: 27017
  type: ClusterIP
---
apiVersion: apps/v1
kind: StatefulSet
metadata:
  name: database
  namespace: web-app
  labels:
    app: database
spec:
  serviceName: database
  replicas: 4
  selector:
    matchLabels:
      app: database
  template:
    metadata:
      labels:
        app: database
    spec:
      containers:
      - name: database
        image: mongo:latest
        ports:
        - containerPort: 27017
        volumeMounts:
        - name: mongo-persistent-storage
          mountPath: /data/db
  volumeClaimTemplates:
  - metadata:
      name: mongo-persistent-storage
      labels:
        app: database
    spec:
      accessModes: [ "ReadWriteOnce" ]
      resources:
        requests:
          storage: 1Gi
Explanation of the above Kubernetes Manifest file
The first Service object creates a LoadBalancer service called “front-end” in the “web-app” namespace that routes traffic to pods with the label “app: front-end” on port 80.
The Deployment object creates a Deployment called “front-end” in the “web-app” namespace with 2 replicas of a container running the latest version of the front-end application on port 80. The Deployment is labeled with “app: front-end” and will be targeted by the “front-end” Service.
The second Service object creates a LoadBalancer service called “middle-end” in the “web-app” namespace that routes traffic to pods with the label “app: middle-end” on port 80.
The second Deployment object creates a Deployment called “middle-end” in the “web-app” namespace with 3 replicas of a container running the latest version of the middle-end application on port 80. The Deployment is labeled with “app: middle-end” and will be targeted by the “middle-end” Service.
The third Service object creates a ClusterIP service called “database” in the “web-app” namespace that routes traffic to pods with the label “app: database” on port 27017.
The StatefulSet object creates a StatefulSet called “database” in the “web-app” namespace with 4 replicas of a container running the latest version of the MongoDB database on port 27017. The StatefulSet is labeled with “app: database” and will be targeted by the “database” Service. The StatefulSet also creates a PersistentVolumeClaim for each replica to allow the database to persist data across restarts.
Kubernetes objects used in the Manifest file:
Service: A Service in Kubernetes is an abstract way to expose an application running on a set of pods as a network service. Services can be exposed in different ways, such as a ClusterIP (only accessible within the cluster), NodePort (exposed on a specific port on each node), or LoadBalancer (exposed externally via an external load balancer). In the Manifest file, the front-end and middle-end Services are exposed as LoadBalancers, while the database Service is exposed as a ClusterIP.
Deployment: A Deployment in Kubernetes is a higher-level object that manages the deployment and scaling of a set of replicas of a pod. It ensures that the desired number of replicas are running and available, and can be used to roll out new versions of the application or roll back to a previous version. In the Manifest file, the front-end and middle-end Deployments each create a set of replicas running the respective application.
StatefulSet: A StatefulSet in Kubernetes is a type of Deployment that is used to manage stateful applications, such as databases. It ensures that each replica of the application has a unique identity and preserves the application’s data across restarts. In the Manifest file, the database StatefulSet creates a set of replicas running the MongoDB database and uses PersistentVolumeClaims to persist the data across restarts.
To deploy the Kubernetes Manifest file using the command line, you can use the kubectl apply command and pass it to the Manifest file as an argument.
kubectl apply -f manifest.yaml
I hope this helps to guide you through the process of deploying the Manifest file. Let me know if you have any questions or if you would like further assistance.
Note*: If you like my content make sure to follow me and cheers, it will give me motivation to create more content.*